Wednesday, July 31, 2013

Black Bean Spinach Enchilada


These are delicious, easy to make, healthy, AND the recipe makes enough for 10 flour tortilla enchiladas! They are great for leftovers and I usually make 1/2 the recipe for a night's meal, and store the other half in the freezer for a future "oh shoot what are we going to make for dinner?" dinner!


15 oz. can black beans, rinsed and drained
1 1/2 cup corn (frozen and thawed)
6 oz. fresh baby spinach 
6 green onions, thinly sliced
1/3 cup cilantro, chopped
2 tsp. cumin
3 cups shredded cheese (I use colby jack)
10 flour tortillas 
10 oz red enchilada sauce 

1) Saute the spinach. I like to use a combo of olive oil and butter, with minced garlic. Once the garlic starts to cook slightly in the skillet, I add the spinach and saute until slightly wilted. Set aside.


2) In a large bowl, combine beans, corn, spinach, onions, cilantro, cumin, and TWO cups cheese. 


3) Preheat oven to 375. Spray 13x9 inch pan with nonstick cooking spray. Cover the bottom with enchilada sauce, but not too much! 


4) Roll the bean mixture (tightly) into the tortillas, folding edges in (just like a burrito.) Place them seam side down in the pan. Now, this is where I make 5 for the evening (and leftovers!) and then wrap 5 in clear plastic wrap and freeze them for those nights that you need a quick dinner. 


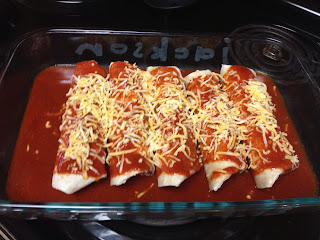
5) Pour remaining enchilada sauce over tortillas, and drizzle with remaining cup of cheese. 


(Please notice our adorable personalized baking dish from Aunt Nancy! "Jackson" on one side, and "est. 5-4-13" on the other... very thoughtful and such a special dish to cook with.)


6) Cook for 20 minutes and garnish with cilantro and green onions if you'd like!


P.S. sour cream is an excellent addition to this dish... however, I realize I used the term "healthy" when describing these enchiladas... so, scratch that.


P.S.S. Just use a little dollop of sour cream ;) 

Sunday, July 28, 2013

Cherry Chicken Spirals

Another recipe that I got from the Better Homes and Gardens magazine... (thank you again mom-in-law for our subscription!) We paired this cherry chicken spiral with corn and au gratin potatoes. Good thing we did because we found the chicken recipe to be lacking some moisture, therefore a cheesy potato dish was perfect with this! It also could have been that we modified a lot of ingredients, which at times I find pays off, but there is times that it doesn't, unfortunately. That is probably one of the best parts of Jeff and I cooking new recipes together on Sundays, is while we're enjoying or creation, we are brainstorming ideas to continuously improve!


4 skinless boneless chicken breast halves
6 slices turkey bacon (we cheated and used real bacon) *make sure the bacon is cooked, but not crispy
2/3 cup dried cherries (probably could get away with 1/3 cup and we used dried cranberries infused with cherry sauce)
3 Tbsp honey mustard (will be halved in the recipe, so for prep,  approximately two separate 1 Tbsp of honey mustard)
1 cup whole wheat panko [Japanese style bread crumbs]
(another change we made here because we already had regular panko bread crumbs at home, however, this may have attributed to the dryness we experienced... always a learning experience!)
1 Tbsp snipped fresh thyme (we went with ground thyme, which, you guessed it! ...we already had, but I would go with fresh thyme)
1/2 tsp ground pepper


Pound the chicken breast halves to about 1/4 to 1/2 inch thickness (the recipe stated, "in a rectangular shape" but as you can see in the top picture, our chicken did not quite make it to a rectangle...but oh well!) Also, I like to prep as much as I can, and have my whole area laid out in the correct order that the dish will be prepared.

So on each chicken breast half, place cooked bacon, and cherry mixture (which is simply the dried cherries mixed with honey mustard.) Roll up, and secure with toothpicks if needed. (Hint: they will most likely be needed!) Brush the rolled up chicken with honey mustard and roll in each in the panko mixture (the bread crumbs, thyme, and pepper.)

Place on a cookie sheet that's been lined with parchment paper, and back at about 375 for approximately 20-25 minutes.

Saturday, July 27, 2013

Shrimp Tacos with Lime Slaw

This was the recipe that I probably got the most interest in... I got the original recipe from the Better Homes and Gardens magazine, under the Dinner on a Dime section... however, shrimp can get costly! But my poor husband gets chicken just about 6 out of 7 nights, so I like to mix it up when we can!
  • 1lb fresh shrimp, peeled & deveined
  • 1tablespoon olive oil
  • 3cloves garlic, minced
  • 1teaspoon ground cumin
  • 1/2teaspoon chili powder
  • 1/2teaspoon salt
  • 1lime
  • 3cups shredded red cabbage
  • 1/2cup sour cream
  • 126-inch corn tortillas
  • 1teaspoon sauce from a canned chipotle pepper in adobo sauce 
  • Fresh cilantro (optional)
  • Lime wedges (optional)
1. Rinse shrimp & pat dry. In a big ziplock bag combine the following: olive oil, garlic, cumin, chili powder and a pinch of salt. Add the shrimp. Coat the shrimp and chill for at least 30 minutes.

(Now, the original recipe calls for the shrimp to be placed on skewers and cooked on the grill... but I like using my cast iron skillet to cook them, as seen in the picture. P.S. I LOVE my cast iron skillet!)
Heat skillet medium to high, toss coated shrimp in, and keep them moving (about 6-8 minutes depending on heat and type of skillet)

2. For lime slaw, in a large bowl, combine shredded cabbage, fresh lime juice, and salt. I like to do this early on, and cover the bowl so that the juices really stay inside. For sauce, combine sour cream and sauce from the can of chipotle peppers.

4.. After the shrimp is cooked, I like to heat the tortillas in the skillet, to soak up the last of the juices and garlic left behind! Spread sauce on the tortillas, and top with lime and shrimp. For that extra touch, garnish with cilantro and serve with lime wedges. Enjoy!

Friday, July 26, 2013

Thai Chicken Pizza

Inspired by a dish at my previous place of employment, and my brother's advice on how to make a homemade pizza... thus my version of a Thai Chicken Pizza was born! 

Now, for the crust, you can always buy one at the store, like a "just add water" one... However, when I do a homemade pizza, I buy the already-made dough at a local pizza place. (funny story, when I walked into Dalia's Pizza, and asked for pizza dough, the obviously new cashier looked at me like I was crazy... "You want just the dough?" and I reply with a smile and a yes, and a coworker explains to him that they do sell pizza dough on its own!)

The toppings that I use are: 
carrots
green onion
peanuts
cilantro
grilled chicken
mozzarella cheese 
The sauce that I use is a Thai Peanut sauce that can be found at Target (usually if I don't find ingredients at Ralph's, I find them at Target)

When I use already made dough, I use flour to help roll it out on the pizza sheet. I melt butter with garlic and lightly brush that around the crust..... Ok ok, who are we kidding, I brush the entire pizza dough!
Spread the sauce, sprinkle the cheese, and top with ingredients desired. I save most of the fresh chopped cilantro for a garnish after the pizza is done cooking, along with a few crushed peanuts also!

Thursday, July 25, 2013

Pulled Pork Sandwich with Coleslaw

Pulled Pork Sandwich with Coleslaw 

1 pork tenderloin (roughly 1.5 lbs)
16 oz. can root beer
your favorite BBQ sauce
(I like to make my own BBQ sauce! The ingredients are usually in my kitchen already, and I think it's what makes these sandwiches pop!)
1 cup ketchup
1/2 cup brown sugar
1/4 cup apple cider vinegar
1 packet Lipton Onion mix
1 Tbsp hot sauce (I use a few drops of sriracha... I'm a baby)


1/2 red cabbage                              
3 carrots (shredded)                                          
1/2 red onion
1/2 cup apple cider vinegar
1/2 cup sugar
1/2 cup olive oil
celery seeds

Combine the apple cider vinegar, sugar, and celery seeds. Then slowly whisk in the olive oil.
Add in the chopped onion, cabbage, and shredded carrots, and toss!

This can be made the night before, or while the meat is in the crock pot. I have found that the key is cutting the red cabbage small, therefore it is easier to consume!


Now... I love me some crock pot meals! This one is extremely easy! I cut the pork tenderloin in half (as you can see in top left picture) and poured root beer in until it covers about 3/4 of the pork.) Cook it on low for about 6 hours or so.

Once it looks like the picture on the bottom left, its ready! It LITERALLY falls apart. I shred it, while it's still inside the pot, then transfer the meat to a separate bowl, and pour the root beer out. Transfer the meat and BBQ sauce back into the pot for about 30 minutes.


Serve on your favorite sandwich rolls and enjoy!!

Welcome!

I like to share my dinner creations on various social media sites, as I'm sure most of you already know! After a few "Can I have the recipe to that dinner you posted?" messages, or "How did you make that!?" comments, I thought... HEY! I should just blog about my cooking experiences, which is a continual learning process for me. Why not share with others who may be looking for new fast & easy dinners for their boyfriend/husband/kids/parents/girlfriend/wife... WHOEVER! Now, I am by no means a pro in the kitchen, but I thoroughly enjoy cooking! I have been learning from different people and enjoy watching cooking shows! My mom has taught me everything I know when it comes to cost saving ideas, portion sizes, and most importantly... all the cooking basics. Along the way, I have picked up some great advice from my brother and mother-in-law who have taught me to not fear unique ingredients (that I most of the time can't even pronounce) and to embrace exotic dishes! I like to take recipes that look good, and tweak them to mine and my husband's liking, while also figuring out ways to cut cost and time! I hope this blog can help you enthusiastically answer that dreaded question... "HONEY, WHAT'S FOR DINNER?"